(More
tech articles on the Tech, Tests & Installs page HERE)
  As
racers, we're always looking to go fast, but slowing safely
is actually much more important. Additionally, for the
footbrakers among us, it's the braking system that holds
the car at the starting line as we're way up on the converter.
That's why when I saw this technical piece about brake
systems on the website of Mark
Williams Enterprises, I knew I had to share
it here with you. The article discusses Pedal Ratio &
Master Cylinder, Master Cylinder Selection, Caliper Alignment
Clearance and Position, Proportioning Valves, Brake Lines
and Fluid, and Troubleshooting. As
racers, we're always looking to go fast, but slowing safely
is actually much more important. Additionally, for the
footbrakers among us, it's the braking system that holds
the car at the starting line as we're way up on the converter.
That's why when I saw this technical piece about brake
systems on the website of Mark
Williams Enterprises, I knew I had to share
it here with you. The article discusses Pedal Ratio &
Master Cylinder, Master Cylinder Selection, Caliper Alignment
Clearance and Position, Proportioning Valves, Brake Lines
and Fluid, and Troubleshooting.
|
Pedal
Ratio & Master Cylinder
________________________________________
Mounting the master cylinder to a frame
rail or roll bar is recommended to ensure a solid mount.
With the correct master cylinder in place, the pedal ratio
must be great enough to produce 1200 psi system pressure
under severe braking conditions. A pedal ratio versus
line pressure calculator is available here.
We recommend using a pressure gauge connected to the system
to verify the maximum available pressure before running
the car. If the desired pressure can not be easily attained
the pedal ratio must be increased until the minimum pressure
of 1000 psi is easily reached.
Master
Cylinder Selection
________________________________________
 A
common problem in many applications is a spongy pedal.
Brake systems inherently have slack in the system that
must be taken up before work can be done by the pads.
Slack comes from two factors: retracted pistons must be
moved back out, and misalignment caused by deflection
in the axle and housing mis-alignment. One of the most
common misconceptions is that a larger master cylinder
will create more pressure. While a larger master cylinder
creates a larger displacement, it takes more force to
create the same pressure as a smaller bore. While a larger
master cylinder will take up system slack with less pedal
stroke, it will take more force to create the same system
pressure. The result after adding the larger master cylinder
is a harder pedal which needs much more pedal pressure
to create the same amount of braking force. For instance,
moving from a 3/4" master cylinder to a 1" requires
77.7% more force on the push rod. A
common problem in many applications is a spongy pedal.
Brake systems inherently have slack in the system that
must be taken up before work can be done by the pads.
Slack comes from two factors: retracted pistons must be
moved back out, and misalignment caused by deflection
in the axle and housing mis-alignment. One of the most
common misconceptions is that a larger master cylinder
will create more pressure. While a larger master cylinder
creates a larger displacement, it takes more force to
create the same pressure as a smaller bore. While a larger
master cylinder will take up system slack with less pedal
stroke, it will take more force to create the same system
pressure. The result after adding the larger master cylinder
is a harder pedal which needs much more pedal pressure
to create the same amount of braking force. For instance,
moving from a 3/4" master cylinder to a 1" requires
77.7% more force on the push rod.
The
goal then is to balance the entire system. Pedal force,
system pressure and lever travel all need to be taken
into account. A balanced system includes the following
things:
1)
A lever that moves the entire stroke of the master cylinder
2) A Lever that moves comfortably in the confines of a car
3) Uses a reasonable amount of force to reach the desired
system pressure
4) Is aligned well enough to minimize lever travel
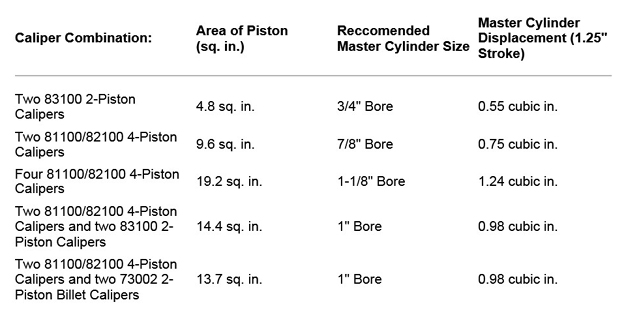
Use
the calculator
to help you find the correct ratios. First find the correct
caliper combination from the chart, then find the correct
ratio for your master cylinder size.
Caliper
Alignment Clearance and Position
________________________________________
Axle stand out controls the alignment of
the brake system and as a result is extremely critical.
To check stand out, first verify that the housing ends
are square to the tube and axles. Install the axles and
check axle standout (face of axle flange to face of housing
end) as accurately as possible. See the chart below for
stand out dimensions for MW brake kits. Stand out should
be + .015 of the dimension listed. Shims are available
to correct the alignment moving the disc outward .015”
(MW
catalog page 62 or online
P/N 71009). Misalignment can cause caliper mount deflection
which is one of the causes of a “spongy” pedal.
Install your wheels to make sure the caliper to wheel
clearance is adequate both radially and from outer face
of the caliper to the inner face of the wheel. To bleed
the system, the calipers must be positioned at 3 or 9
o’clock. This allows the bleeder to be highest point,
ensuring that all air is removed from system.
Common
Standouts
________________________________________
Proportioning
(Pressure Reducing) Valve
________________________________________
The front brake kits with the integral
hub and adaptor are designed for Drag Race applications.
The main advantage is the reduction of weight compared
to the stock braking system they are designed to replace.
Several considerations must be taken into account when
installing these kits. When any four piston caliper is
used with drum brakes on the rear, a pressure reducing
valve must be installed for front pressure control. Because
of the small front tire contact area compared to the rear
large slick contact area, the rear brakes must absorb
more of the stopping energy than the front (contrary to
a normal street car). A starting point would be 70% of
the rear line pressure to the front brakes. This is especially
important when using drum brakes on the rear. With discs
on both the front and rear the percentage could be higher
depending on the weight distribution and tire size but
should still use the pressure reducing valve. We have
a pressure reducing valve, P/N
260-2200, and we recommend its installation with front
brakes. The pressure bias should be adjusted with gauges,
MW
P/N 81105, in the front and rear to confirm the pressure
differential and then do a stop test. When doing a stop
test, for a drag race car, the front tires should skid
equally or slightly after the rear tires. This test can
be simulated at a very low speed (approximately 5 mph)
by using a wet surface or gravel and observing the lock
up sequence.
Brake
Lines and Fluid
________________________________________
Aircraft AN-3 brake lines and fittings
are recommended. Only stainless steel braided teflon hose,
stainless or seamless steel tubing (3/16” x .028”)
should be used for brake lines. MW has available swaged
Teflon Stainless flexible braided line that can be fabricated
on a same day basis. The are available online P/N
0300-X-X. Lines should be secured to chassis rails
to resist vibration and routed in such a way to avoid
possible contact with wheels, tires and other moving parts.
Joining hard line and braided line or “T”s
should be done using a bulkhead fitting and a small tab
welded to the chassis. Long runs should be done with hard
tubing to avoid expansion of flexible line. The amount
of flexible braided hose in the system should be kept
to a minimum. See page
63 or the online
store for AN -3 fittings and brake line. Use of DOT
4 or 5.1 fluid with a high boiling point and lubrication
for seals and pistons is recommended. Do not use (DOT
5) silicone fluids .
Troubleshooting
Your Brakes
________________________________________
Spongy
Pedal:
________________________________________
1) Air in system. Bleed brakes, making
sure that the bleed valve is the highest point.
2) Disc warped (saucer shaped). Replace or surface rotors
3) Calipers not square with disc. Check housing end alignment,
both concentricity and squareness.
4) Linings worn on taper. Make sure that caliper is centered
over the rotor and the caliper bracket is not deflecting.
5) Master cylinder bore too small creating excessive high
line pressure. Match master cylinder to system.
6) Master cylinder deflection. Stiffen master cylinder
mounts
Brakes
are locked up after run:
________________________________________
The piston in the master cylinder is not
being allowed to return to the full retract location,
when released. This condition will maintains line pressure
and prevents the car from moving. Re-adjust the linkage
so that the piston completely returns to the retract location.
Excessive
pad wear, disc shows excess heat:
________________________________________
1) Lining too thin causing rapid heat transfer
to calipers, boiling the fluid. Install new linings and
re-bleed system.
2) Fluid contaminated with moisture causing boiling of
fluid in caliper. Flush old fluid and replace with DOT
5.1 Fluid re-bleed system.
Maintenance:
________________________________________
Annual disassembly and cleaning of brake
system recommended. Carefully inspect pistons and piston
bores. Re-assemble with new “O” rings.
|
|
Source:
Mark Williams Enterprises
www.MarkWilliams.com
|
Dragtime
News On Location |
Tech,
Tests & Installs |
Bracket
Racing 101 |
|
|
Visit
the Tech,
Tests & Installs main page. |
Visit
the Bracket
Racing 101 main page.
|
|
|
|
|
|
 |
